Search This Blog

Tuesday, September 29, 2015

Carbohydrate Summary Sheet

Finally!  I have had this Carbohydrate Summary Sheet completed since mid summer, and I finally scanned it in.


If you would like a digital copy check it out on out on our We Teach High School store on Teachers Pay Teachers.

FYI I am working on a Summary Sheet for Photosynthesis ... keep in touch

Tuesday, September 22, 2015

The beginning of DEVOLSON

If you are familiar with the term DEVOLSON (Dark Evil Vortex of Late September, October & November) you have homework tonight: go to Love, Teach and read.

My DEVOLSON officially began with a bad cold, and as most of you would do I went to school anyway.  I regretted the decision all day, but didn't want to put off our first AP lab or my freshmen test that had already been rescheduled due to the homecoming pep rally.  And at the end of the day I graded the tests and found this


And it wasn't alone ...

It never occurred to me to teach the kids how to fill in an answer sheet, so I guess that is another teacher-fail for me.

I did have a couple of kids ask, which I don't remember ever happening before ...  last year Was the year of children using pen on the grade forms ...

So, apparently I am going to have to teach how to fill out an answer form next year.  

Unlike you I did give up and get a sub for today, but not because of DEVOLSON. Now, go do your homework and read about DEVOLSON.

Saturday, September 19, 2015

History of ... iMovie Project

Wow, what a start to the year.  Is anyone else a little tired?  Yep, me neither.  I know I have shared my Forensics iMovies before.  This year I gave the students less time than I think I ever have before, and not only did they still do a pretty good job, but almost everyone turned in a complete project.

So if you teach a subject where students have to research contributions for a field, or you just have an excess of names to learn this iMovie idea may help you and your students out.  I use this with Forensics and Biology.  The kids each sign up for a scientist (only one kid per class can sign up for each scientist).  This year I gave the students one day to research their scientist.  They needed to find their main contribution to forensic scientist (why they are on the list), and then 9 more facts.  The students needed at least three sources, the book and two websites or three websites.  Almost everyone got all ten facts in the first day.  I told the kids to save pictures and links to the sites they used on the ipads.

And about half of the kids were able to finish their videos done in one day, so I extended the deadline and gave the kiddos another day.  As they finished the videos they emailed the project to me.  I saved them all in a folder and then once I had them all I uploaded them to my YouTube channel which allows the students to show their work off.  I uploaded the videos in a playlist by project and period and left the videos as unlisted at first at least.  I also like to use the YouTube playlist to present because to prevents all the discussions of who goes first, and it just keeps the presentations moving along as quickly as you can.

I have the kids write down the scientist name and what they think the major contribution down, and I supplement this with a list I generated that I expect the students to learn.

Here are a few examples from this year.


Chase


Chelsea

These examples will show you how concise the information needs to be.  It shows you a few of the templates available.  I hope this gives you lots of ideas as well as tips for your kiddos.

Tuesday, September 15, 2015

Some days ...

Everyone has rough days.  For teachers there are several days that we share, the day of Meet the Teacher and the day after ... It's like a work hangover.  You spend over 12 hours at school, go home for less than 12 and head back to school.  I have one task on my to-do list tomorrow: survive.  

Some days the odds are stacked against you and if you are going to survive in this field (or any other) you have to see stress as a challenge or as a way to energize yourself for the task at hand.


Some days you have to eat gelato ... out of the container ... with a fork.

I hope you have plenty of clean dishes and clothes, extra money before payday, rewarding days and relaxing nights!


Saturday, September 12, 2015

New Calendar - Thanks Silhouette

I have made a few improvements to my three-week calendar.  


You can see my calendar in action here (ignore my to do list & pretend it's complete).  This was taken during the week of staff development.


I started out by trying to give myself a guide line so the days were not too slanted.


Then I folded the vinyl back with the letters sticking up.  And I gently trying to stick the tops to the board then slowly roll the letters on to the board and remove the backing.


I also made a place for reminders.  This allows me to write due dates and reminders and then at the end of the day I send out text reminders using remind.com.


So I am very happy with my silhouette, and they vinyl letters that make my board so much nicer.  And I can still spray the board with wonder and the letters do not move! Very important detail for my sanity.  

And the toughest part of the project was picking a font and size.  I highly recommend printing the text you want on paper and putting it on the board to try it out!


Friday, September 11, 2015

Organization is Essential!

I have quickly learned that good organizational skills can make a world of difference! Here are a few forms I've created to keep my students and myself organized this year!

The picture below is my absent work station. I have a folder for each day of the week. At the end of each day, I place the work from that day in the folder. This makes it easy for the student to come grab their work without me having to find what they missed and remind them. My students know they are responsible for getting their missed work. This makes it an easy system for all of us!


The following filing tub has been a life-saver this year! I have an individual folder for each of my students. This is where they keep important information that is kept in the folder, inside my room at all times. These folders are wonderful when it comes time to attend a parent meeting! I have all the information I need to know about the student in their folder, so it is the perfect thing to assist me in parent meetings. 


The first form inside the student folder is a table of contents. This helps the students keep their papers in order so they are easy to find.

The student profile form is a page the students fill out on the first day of school.  This is kept in their folder. 


I also make the students keep track of their own absences and tardies on the following form. This helps to hold them accountable, as well as keep them aware of how much they are missing class. They take tardies a little more seriously when they see how many they have had to log in their folder. 


The following form is a motivation form that the students fill out on the second day of school. I always get a good insight into who they are and what their priorities and interests are from this form. 


The following form is an AR book approval form. The students are required to show me their books before they check them out from the library. I check to make sure the book is in their reading level and contains the required page count before they are allowed to read the book. 


The following form is where the students and I log their AR test information so we can easily keep track of it. This also allows the students to view their test grades at any time. 

I have also down-sized my syllabus this year. I place every AR deadline for the entire year on the syllabus so the parents and students are aware of the deadlines.


Wednesday, September 9, 2015

Paper Flower

In the search for more up-cycled classroom decor, I began thinking back to my cousin's wedding.  He had a beautiful backdrop made of paper flowers all in white.  My room is already overwhelmingly white, so purple seemed like an obvious choice.  So I pinterest-ed dahlia flower, and after following multiple links I finally found a tutorial at Love, Pomegranate House.  


Thanks to craft night and some very generous friends, I got all these tube-y parts made.  Big thanks to Erin rolling the paper, letting me glue it, then Chonte' holding it long enough for the hot glue to cool ... with their help it only took a couple of hours to get these tube-y pieces done ... (disclaimer: I have a tendency to exaggerate).


Once home I began gluing the individual pieces to a cardboard circle I cut from a cereal box.  I started with darker colors and worked my way in.  I used each piece of the darkest paper, and very few pieces of the lightest color.


Pretty, right?  I used the flower along with some re-purposed, reclaimed fence pickets (free from my Dad), and a minnow can my husband picked up at a garage sale for one dollar.  I have had the drawings for years.  The artist is a friend of my family, and though this picture is tough to see, one is a bass and one is a duck.  I removed the red mat I originally had around the drawings, but never really liked, and just put my cheap IKEA paper in the frame and put the drawings on top.   I also have a raccoon drawing from the same artist.  I hung it in the back of the room.  


I am going to have to get a better picture later - the glare is killing me, but I love that this is visible from my desk.  I love my new room.


Saturday, September 5, 2015

10X10 Review Activity

I tried a new activity this week called 10X10.  I read about this in an Edutopia article by Warren Berger called 5 Ways to Help Your Students Become Better Questioners.  In the article he attributed the activity to a second-grade teacher named Julie Grimm.  So I have a big thanks for Warren and Julie -- Thanks!!


I made this ppt slide for my kiddos when we do this activity.  So that they and I can remember the guidelines.

Since my AP Biology class is approaching their first test (over Biochemistry), I decided to use the 10X10 activity as a bell-ringer.  Then I let my kiddos work on the Legacy of Learning Project for 15ish minutes while I looked over their questions (in between answering tech questions, helping them on their projects and putting out "fires").  And as I read their questions I was so impressed by them that I started typing them so that when the 15 minute time period was up we could go over some of the questions.

This is definitely going to be a well used tool in my classroom particularly when we are approaching review or when we are covering more difficult material.

If you try this, let me know how your kiddos do?

Thursday, September 3, 2015

Classroom Decor!!

Let's face it, we've all heard the research based classroom decorating tips. Unfortunately, the research on lighting and colors that are best for a conducive learning environment tend to differ with each new school year. I've come to realize that every teacher is different, therefore, what works for the classroom is not uniform for everyone.

For my decorations, I did decide to go with multiple colors. In the past I have kept my room in school colors, red and white, but I got bored with that after five years of the same thing. So this year I decided to make it more colorful.

I bought this colorful chevron material from Hobby Lobby to cover my bulletin boards. I always trim my bulletin boards in ribbon. I feel that the teacher boarders are a little elementary, and ribbon is more plain. Plus, at Hobby Lobby you can find any ribbon imaginable to go with your theme!


My bulletin board outside the room is typically used for some encouragement, as well as an introduction to what my class is. I used this We Are theme that I found from Pinterest a few years ago. I did this same theme last year, but with a different color scheme. Since I am an English teacher, it has things like "we are...authors, readers...," then at the bottom it has our school mascot, REBELS.


My inside bulletin board is used for rules, schedules, and classroom routines.

I wrapped two of my stools in ribbon.I only did this for two of them because it was too expensive to continue. I found it was MUCH cheaper to spray paint, so with my two remaining stools that is what I did. I used left over material from the bulletin boards to make seat covers for my stools. (I cannot take full credit for this because my grandmother did the work- I don't sew!) The material was cut in a circle- we did the size of the stool, plus a couple inches. The extra inches allowed us to fold the material under and place an elastic strip under the fold.


I also down-sized my podium because my wooden one was taking up too much space. I have a simple metal podium now and I spray painted it to make it match.


Lighting- 
For lighting this year, I plan to use the typical fluorescent ceiling lights for most days. I did accessorize the room with lamps that I can use one days that we will be using the projector a lot, or for the Edgar Allan Poe reading days! I also accessorized my board with rope lights that I plan to plug in each day to make it a little brighter in my room!

Smell- I plan to keep an Airwick plug-in the entire year! Students love when my room smells good, and so do I! However, in the past I have failed to replace them when they run out. This year will be different!! 

Folders-
These student folders have been a life-saver!! Each student of mine has their own individual folder that will stay in class. They pick up their folder each day upon entering the classroom. Inside the folder is a calendar of events and lesson plans, this also includes upcoming projects, tests, and deadlines. I store learning and personality styles in the folder, as well as tests. Since I am an English teacher who uses the A.R. program, I also keep their A.R. testing record, reading level, and book logs in the folder. The best part about these folders is that they are perfect for parent-teacher meetings!! It is so easy to keep up with student information if they each have a folder.

Student table- This table is for the students. On this table they will find their personal folders that I spoke of earlier. They will also find the work they missed while they were absent. I keep a folder for each day of the week and place work in the folders daily. The students know to go to that folder to pick up what they missed. The table also includes supplies they may need including scissors, markers, crayons, tape, and staplers. The student table keeps them away from my desk and away from my personal supplies. 

Desks- 
I have arranged my desks so they are in small groups, but they are all facing the front of the room. I have used Duct tape to attach zip lock bags on each desk that include a pen and a highlighter. I'm hoping this will alleviate them coming to class without supplies problem. 
I have a ziplock bag taped to each desk that includes a pen and a highlighter. 


Tuesday, September 1, 2015

Experimental Design, Scientific Method & Paper Airplanes

So sometimes it's nice to let your kids out of their seats.  And I think scientific method is really important, but sometimes it's really boring ... but not in your class ... just in mine.  So I experienced an activity in AP training where you use paper airplanes to talk about experimental design, and I have fleshed it out and made a 
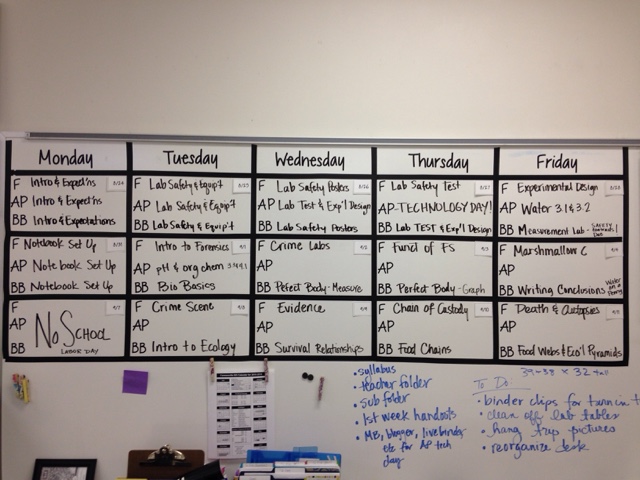
power point so I can remember from period to period and year to year what my next step is.


You start off having the kids make paper air planes, writing their names on them and giving them a throw.  Then you measure distance traveled (by number of floor tiles) and they record their data, and make one change to the design.  At this point I have the students write a hypothesis, they write it on their plane and follow my template.  Then we throw again, record data and talk about independent variables, dependent variables and controls.  I talk about repeated trials.  I also talk about control groups (but its not in the ppt).  We write a conclusion and talk about the hypothesis being supported or not supported  The students write all their information for the class on their plane and turn them in at the end of class.


You can even talk about peer-review for those students who would like a tutorial from a classmate whose airplane is getting better results.  This is also a great time to talk about the difference between cheating and getting help.  If a friend is making a plane for you or giving you their plane, that is cheating.  If a friend is teaching you how to make a plane without touching your paper, that is a tutorial.


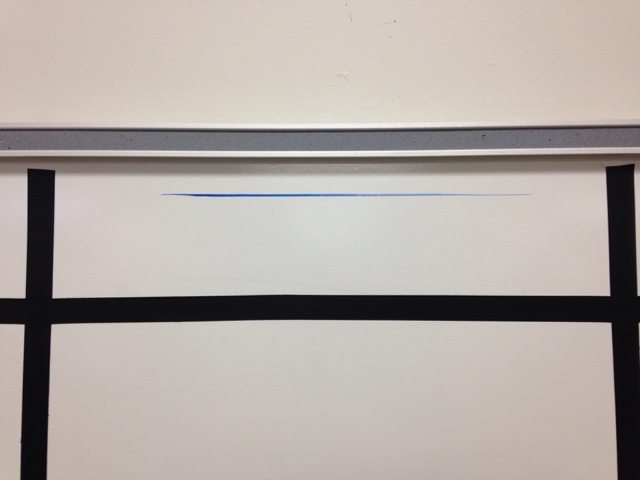
So why are there post-its all over the back of my room?  Because, I tell students that if they can make it past the back grey line in my room, they can put their name on a post it, and brag to their friends.  Everything is better if it's a competition.  If the planes slide on the floor, I count it.  

I am not nice enough to take the kids out in the hall for this activity (though you can probably get bonus points from your principals if you do).  If the students complain about the planes hitting tables or other obstacles, I explain that life is full of obstacles and we have to learn to work around them and to keep trying after we hit obstacles.

It is also important to note that I send an email to all the teachers in my building letting them know that my students have been making paper airplanes and have been told not to make or throw paper airplanes in other classes, or they will get in trouble.  And I tell the kids that their teachers know they are not supposed to be making paper airplanes in other classes.  Not that I don't trust teenagers, but ...